
I have recently purchased the aforementioned dash camera, based on a great feedback and reviews from fellow Tesla owners, as well as a personal preference (I think it just looks slick compare to other devices). After watching a number of how-to videos I grew confident that I could perform the installation myself. Unlike the others, I managed to do it without removing the large piece of trim from the tailgate, which definitely simplifies the whole process (no messing around with speaker and light wires or trying to realign everything when clipping it back on). I thought it might be helpful to other DYI’ers out there.
An update:
I have (finally!) made a video describing the whole process as well. Enjoy!
Disclaimer: I consider myself a reasonably skilled handyman. This installation requires some manual skills, as well as basic knowledge of low-voltage electrical systems. If you are worried about damaging your car or harming yourself in the process, you are better off hiring a professional to do the installation for you. I take no responsibility for any of the mishaps along the way, so proceed at your own risk and with caution!
With that out of the way, shall we?
Other than the dash camera (BlackVue DR750-2CH or BlackVue DR900-2CH), here are the items I used:
- 4-pin fan power extension cable
- Cable with 3.5 mm 12 V DC plug on one end
- Some heat shrink tubes and soldering station (if you are comfortable soldering the wires, otherwise you can use butt splice connectors)
- Heat gun
- Trim panel retainer clips (you will break some of them in the process)
- In-line fuse holder
- Automotive fuse (a single 3 A or 5 A fuse will suffice)
- Wire stripper
- Multi-meter
- Steel fish tape
- Wire fishing rod set
- 3M Blue Painter’s tape
- Torx screwdriver and bits (T15 – T20)
- Trim removal tool (the one that came with the camera should suffice).
Disclaimer: The above are my Amazon Associate program links – I earn a small commission from any items sold through these links, which in return helps me to cover at least part of the cost of running this blog. Your contributions are greatly appreciated!
Before you begin, make sure your work area is well lit and ventilated (there might be some sweat involved). You might also want to secure some soft rags/towels to protect your upholstery and body panels when moving around the car, especially where the fish tape could come in contact with the painted surface. Thank me later.
First Step – making a harness to connect to auxiliary in-vehicle power
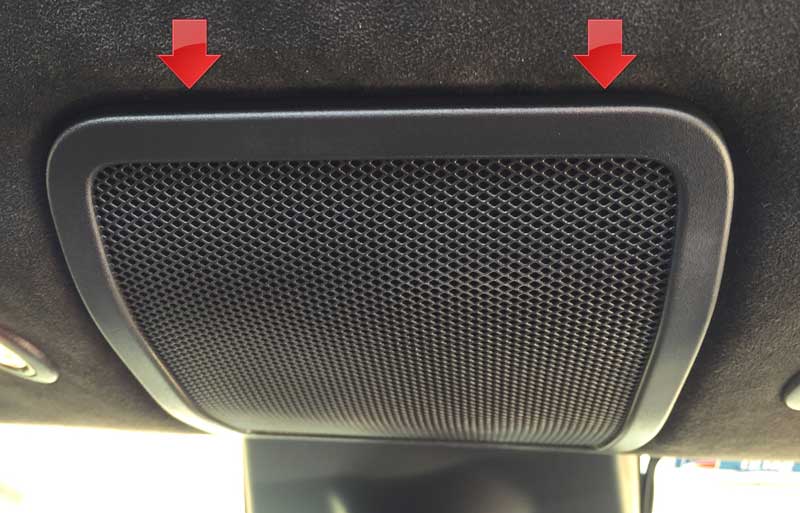
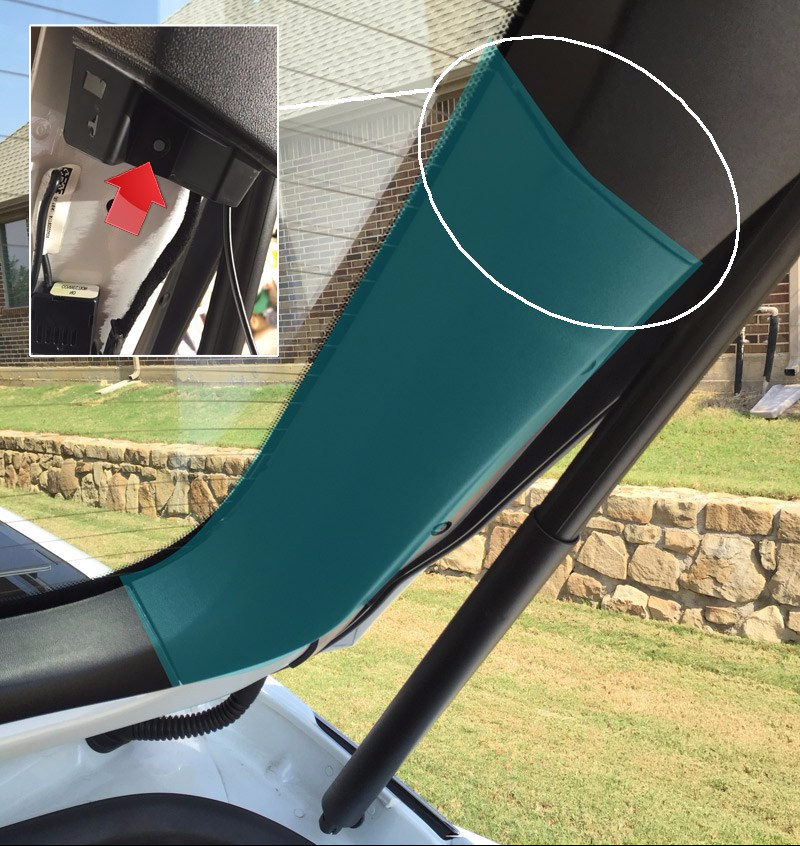
- Pop down (using your fingers) the microphone grill to find the auxiliary power connector.
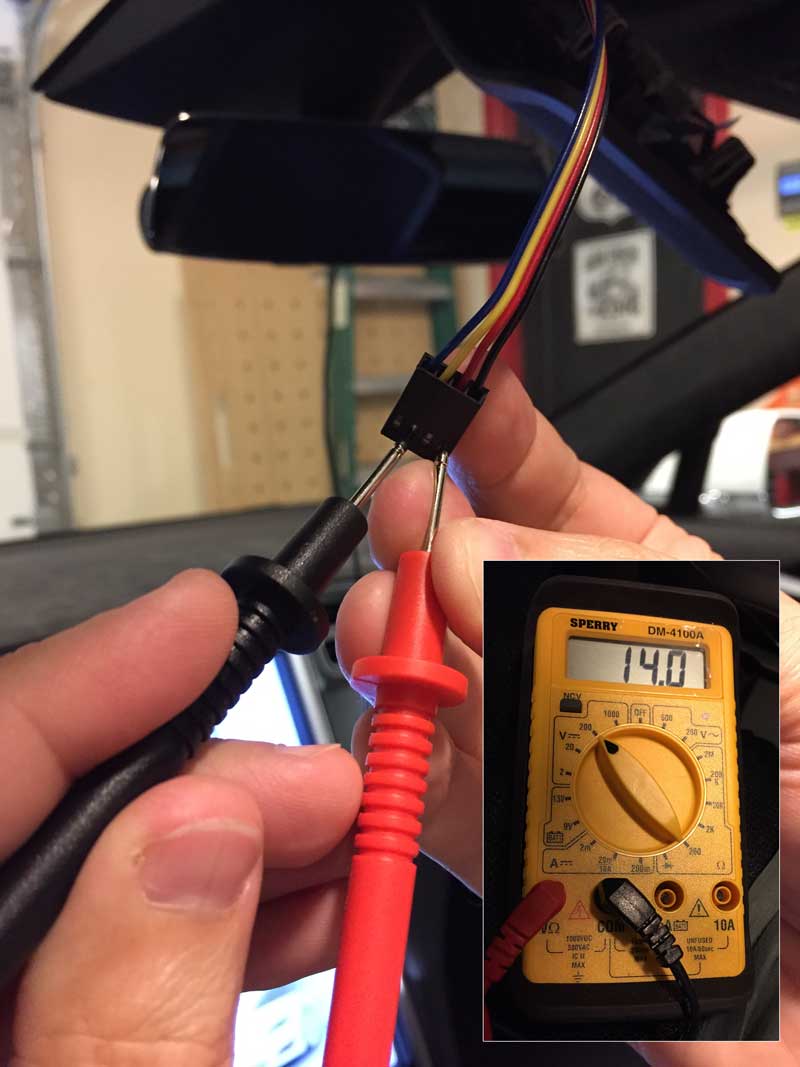
2. Connect the 4-pin fan power extension cable to the in-car auxiliary connector and using multi-meter find a pair of wires providing at least 12 V DC. In my case, it was a black/yellow pair and the reading on multi-meter has confirmed 14 V DC:
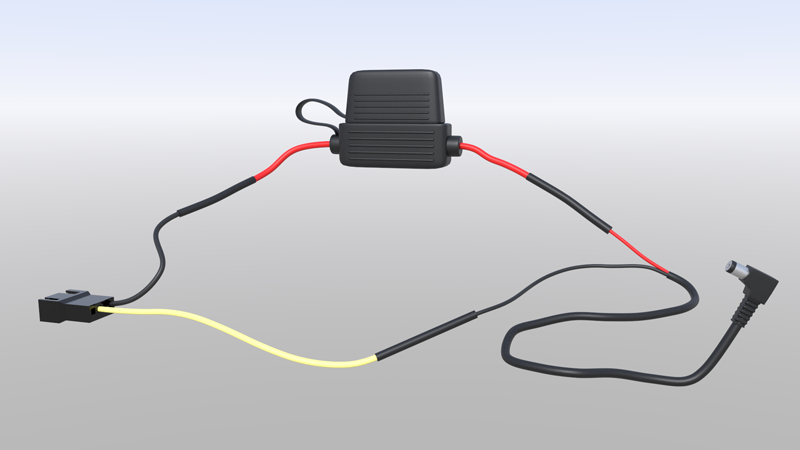
Take note of your color combination, as it may vary. Assuming it is the same color combination, here’s a render of the harness I have created:
Do not connect the home-made harness to the auxiliary power just yet.
Fishing the power and coaxial cables through the microphone grill
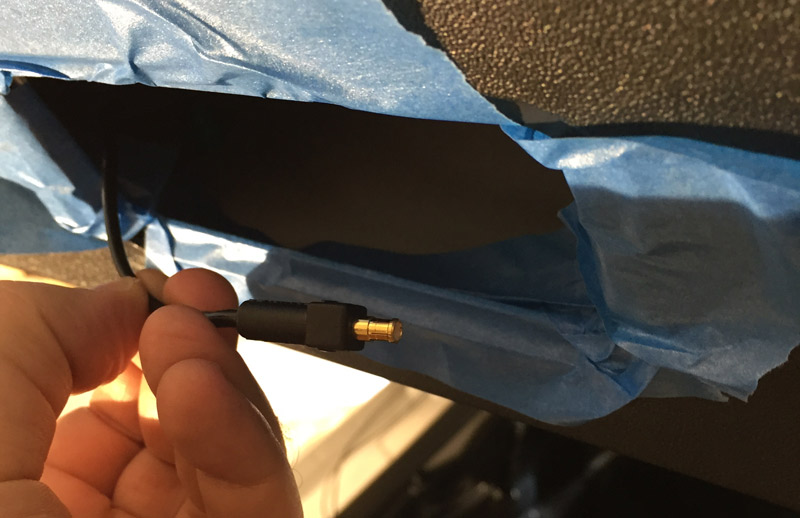
3. Attach one end of the harness (the one with 3.5 mm mini-jack on its end) right behind the plastic tip of the steel fish tape and wrap it tightly with the blue tape. Gently run the steel fish tape through the microphone opening towards the front of the car until you can fetch it right where the headliner meets the top of the windshield. The tip of the fish tape should come out to the right side of the rear view mirror assembly. Pull the tip of the fishing tape gently down and away from the glass as you pass it through, so you don’t accidentally damage your windshield in the process. You only need to leave a few inches of harness hanging out to connect to the camera. Unfortunately, I didn’t take the picture of this step (probably being too excited after seeing how easy it was!), but the picture below should give you an idea. The microphone grill should be in the open position of course 😉

4. Repeat the same procedure to fish the coaxial cable for the rear camera through. I would highly recommend that you use the 90-degree angled end at the front of the car. This insures you have the straight end of the cable to feed through the boot/tube at the back. It is much easier to feed a straight-end connector than the right-angle connector through the tight areas such as the boot. The right-angled connector also looks cooler when attached to the front camera.
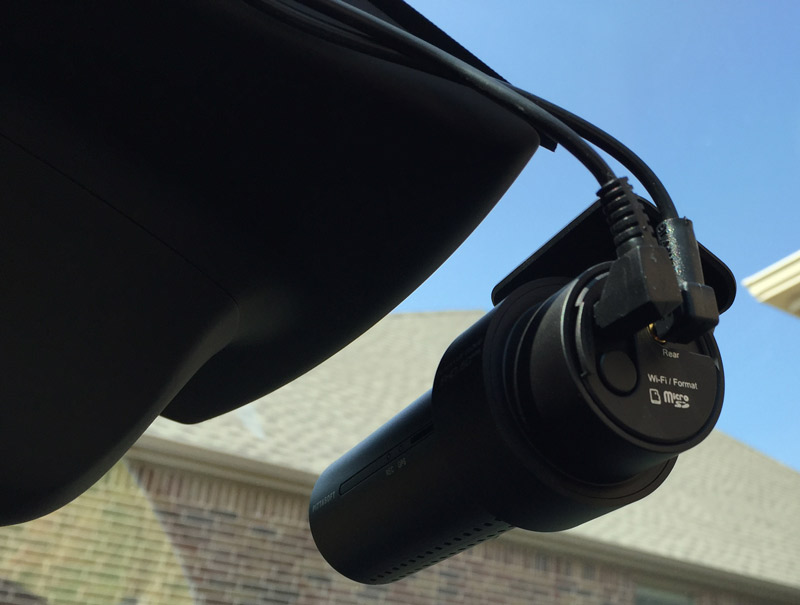
5. Before you connect camera to the power, make sure the appropriate fuse (either 3 or 5 A) is inserted into the holder and the harness we made earlier is plugged into the auxiliary power of the car. Then, follow the manual that was provided with your camera to initialize it, but do not attach it permanently to your windshield yet. Once you successfully initialize the camera and connect your mobile device to its built-in wireless network you will be able to preview the image that the camera is registering. This will help you with necessary alignments before you permanently attach the mounting collar/bracket to your car’s window.
Mounting the front dash camera to the windshield
6. The lens of the camera should be vertically aligned at the center of the windshield. You don’t need to worry about the precise tilt angle, you can rotate the camera once it is mounted inside the collar for the final adjustment. The preview on your phone will also help.
Tip: You might want to ask someone for help to stand in the front of the car as you position the camera.
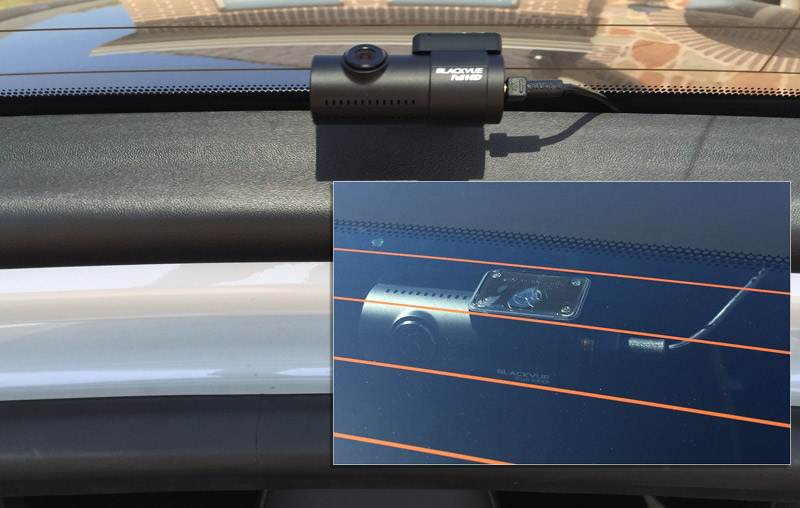
The bracket itself should be about 1/2″ – 3/4″ below its right edge (roughly) aligned with the car’s front-facing cameras (see below). You want to make sure that the camera’s position will not block the sensor at the back of the rear-view mirror!
7. Once you are confident that you’ve got the right spot to mount the front dash camera, peel off the protective foil and hold the bracket firmly to the windshield for about 10 seconds (keep pressing it evenly against the glass).
Running the coaxial cable to the back of the vehicle
8. Unplug the power from the front camera, but leave the coaxial cable plugged in, so that you have an idea how much slack is needed as you pass the other towards the rear of the car.
Note: in case you are at the crossroads if you should run the rear camera cable through the driver (left) or passenger (right) side, here’s the correct answer: use the passenger side. The boot/tube on the left side contains wiring that feeds the antennas. It has been reported that BlackVue and antennas can be impacted when close to each other. Also, be extra careful not to damage the shielding of the coax cable. This also includes a temptation to trim the cable to optimum length to avoid any excessive slack. The cable is shielded for a reason. You don’t want to introduce any interference.
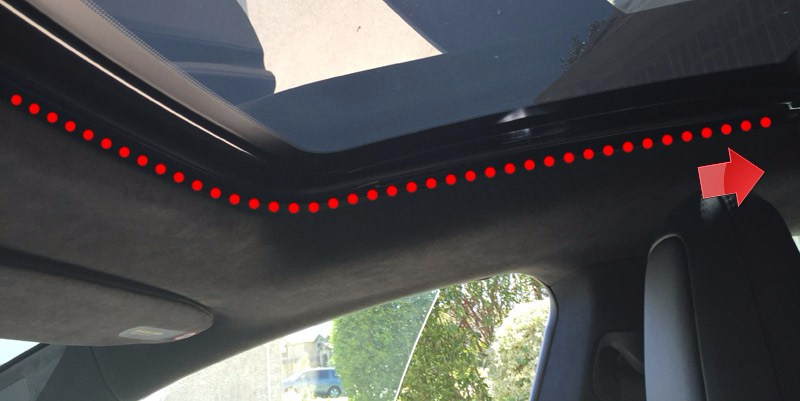
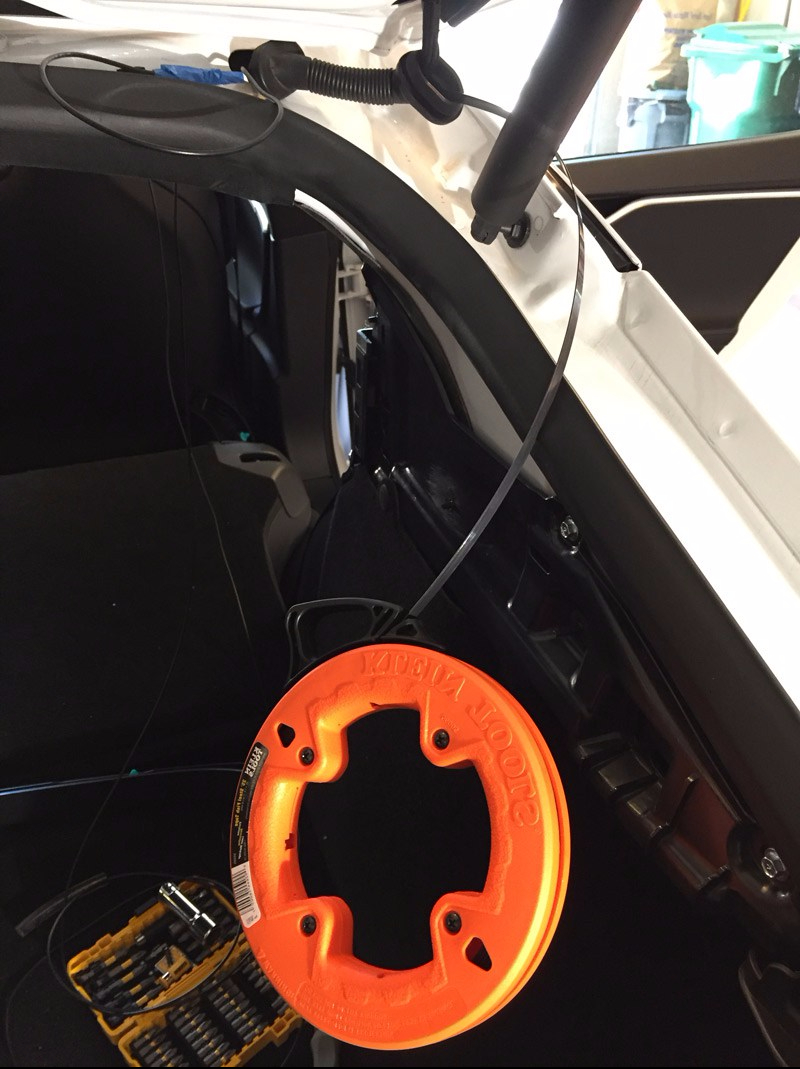
9. There’s a nice gap between the headliner and the roof, perfect to tuck the cable in:
Run the cable along the passenger’s side, continuing towards the back:
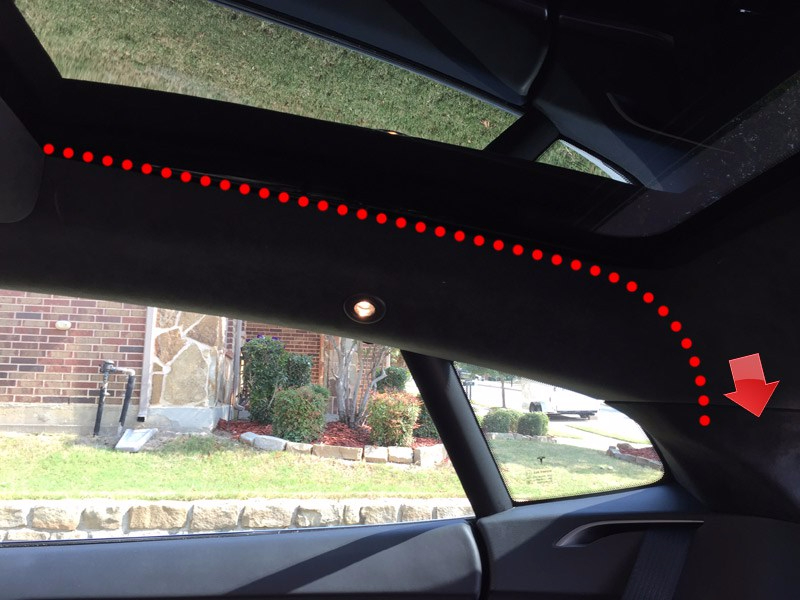
“Jump” over the B pillar and continue your way toward the C one:
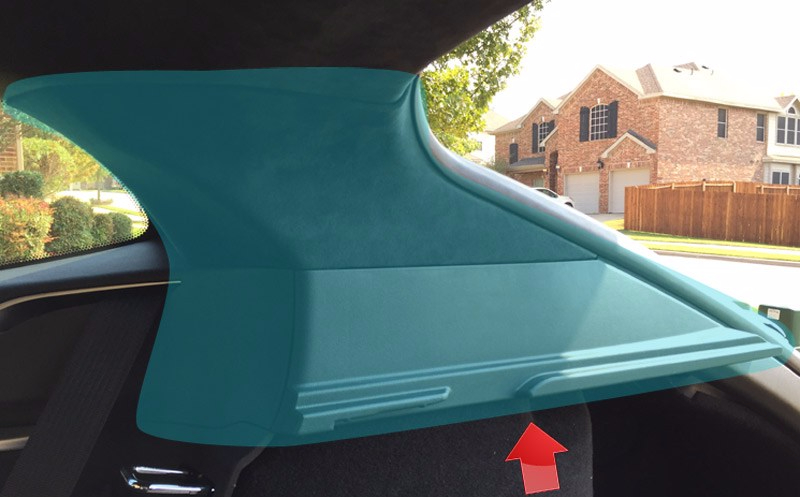
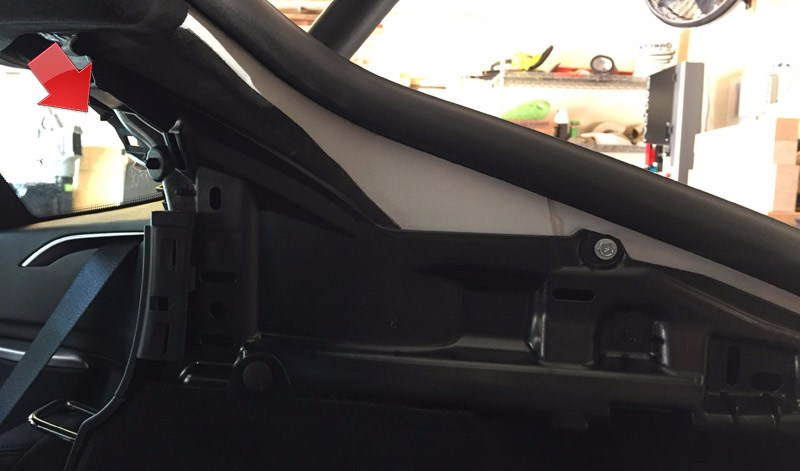
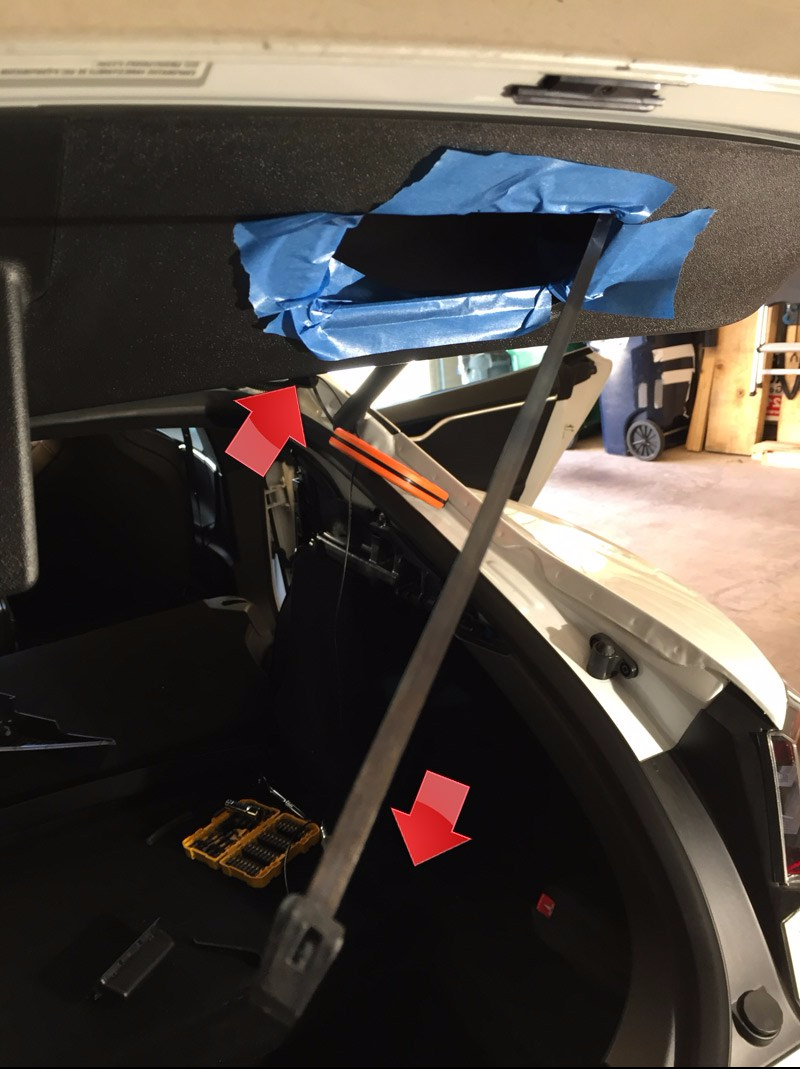
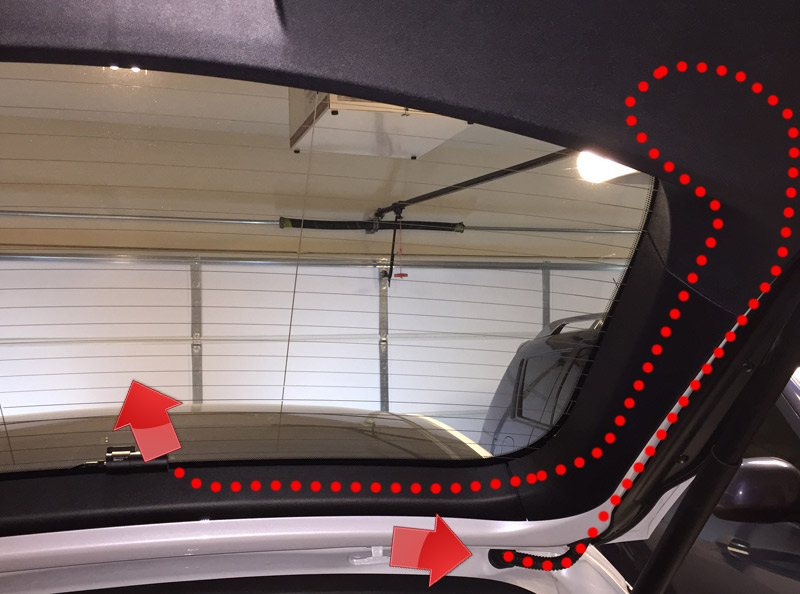
10. Now, we need to remove the two pieces of the trim. The top piece (with the texture matching the headliner) is held in place by spring metal clips against the C pillar and plastic latches against the lower piece of the trim – simply grab it around its edges and wiggle/pull it straight towards you.
The bottom piece is held in place with a single Torx T20 screw (an arrow on the picture below marks its approximate location). Remove the screw and pull the trim toward you.
Pass the cable behind the headliner to the open area where the upper piece of the trim was attached:
Passing the cable through to the tailgate
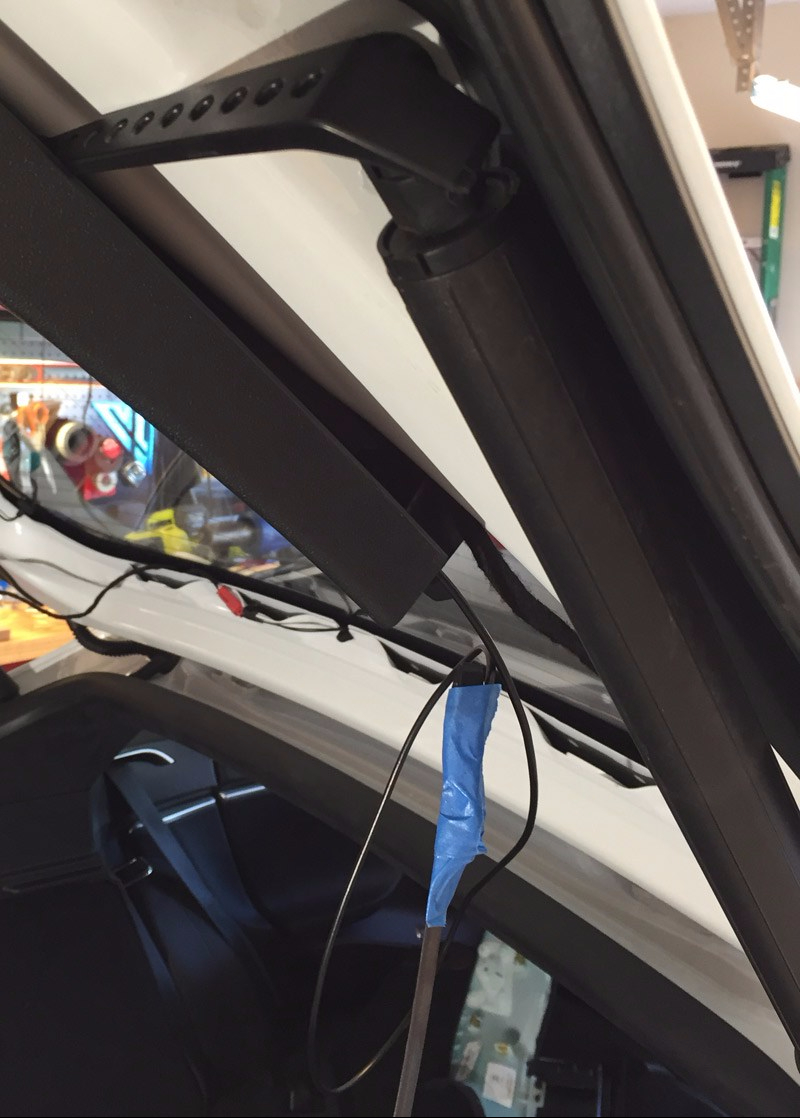
11. Without applying much stress/pressure, pull both grommets until they snap out of the holes in the car’s body. Be extremely careful not to damage the interconnecting tubing or wires that go through in the process!
Gently push the steel fish tape through to fetch the coaxial cable.
Warning: Don’t use your steel fishing tape if the plastic tip has been misplaced. This could cause damage to the tube or the existing wire bundle running through. The boot can be replaced only by the Service Center personnel and will most likely come at your own expense. Bottom line, you want to keep it intact to prevent any damage caused by water leaks!
Hint: It helps to compress the tubing to shorten the path, but also to minimize the tension or possibility to puncture the tube.
12. Once you are on the other side, attach the tip of the coax cable to the fishing tape. Slowly and carefully pull it back and detach the camera wire.
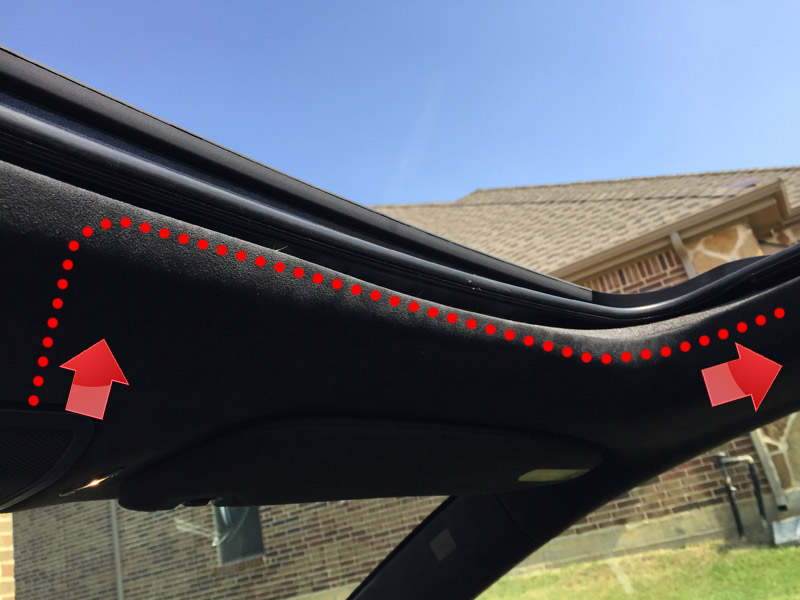
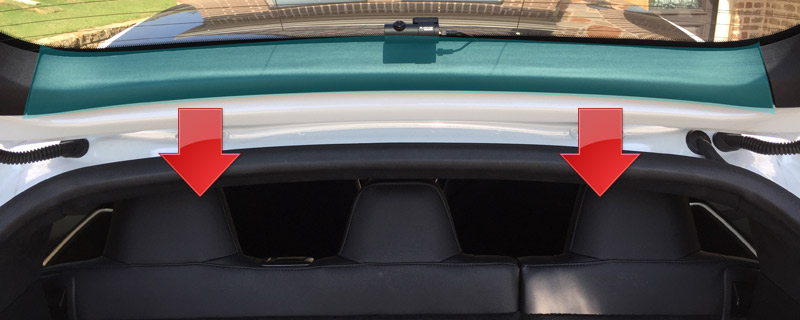
13. Remove the horizontal piece of the trim (top edge of the tailgate, but appearing as if at the bottom when the tailgate is open) by pulling it straight towards yourself. It is attached to the car’s body using standard retainer clips, but it is also interlocked with the adjacent vertical trim pieces. I pulled it starting from the points indicated by arrows (picture below), then wiggling it free – one side at a time – from the interlock.
14. Remove the passenger’s side vertical trim as well. Similarly, it is also attached using retainer clips and interlocked with the adjacent panel, so start from the bottom and move your way up. I have highlighted the area where the two pieces of trim interlock together.
15. Since we are here, remove the single torx screw (I think it is T16) that helps to hold the large piece of trim in place – the red arrow marks the spot where the screw is located. As promised earlier, we won’t be removing that part at all, but removing the screw will give us some additional wiggle room when running the cable. Don’t worry, it will become clearer in step 20.
16. Remove the door handle assembly by pulling it towards you – I used the trim removal tool that came with the camera to pry one of the edges upwards without scuffing it. This step requires some force. There are no clips holding it in place, just some notches.
I have also applied some blue tape around the handle mount to protect the plastic from scuff marks (and my own skin when rubbing against it, the edges are sharp!).
Important note: if your car is equipped with automated lift gate, there is a wire harness attached to the back of the handle. Be careful when you pull the handle towards you, so you don’t damage the cable. Detach the cable and tape it to the trim, so you don’t have to fish for it later!
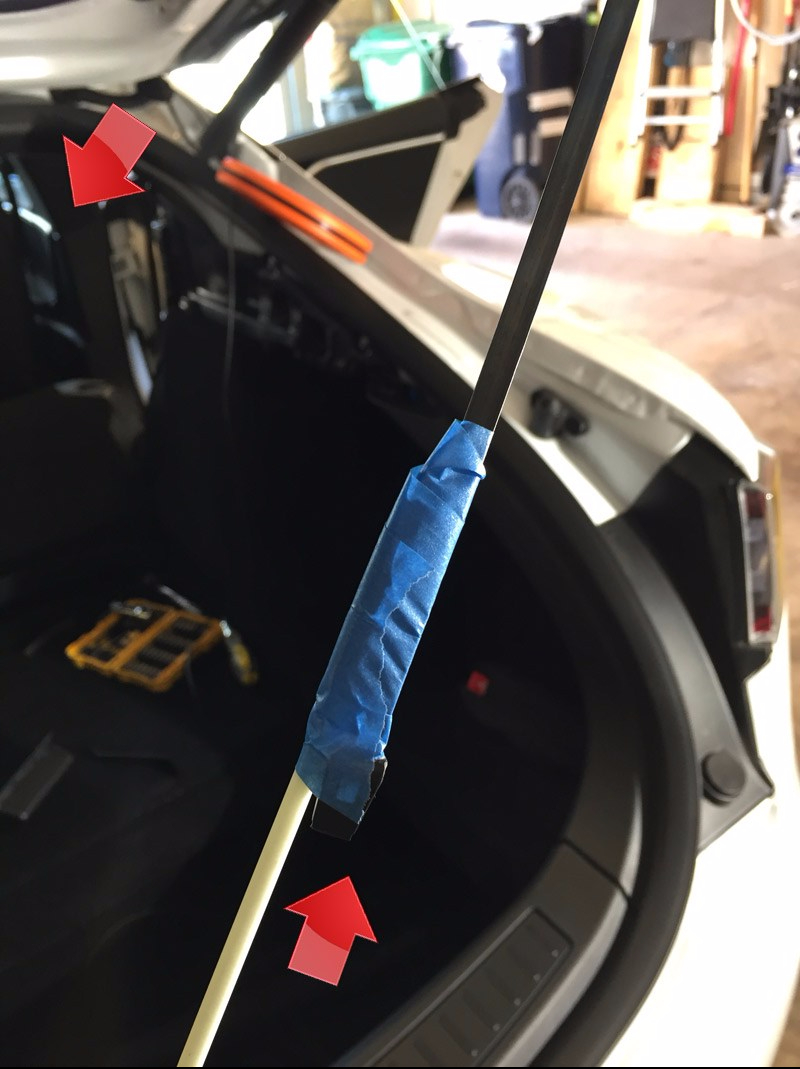
17. Run the fishing tape through the tailgate. Start at the location where the grommet attaches to the tailgate (marked with an arrow pointing up on the picture below) and finish out through the hole where the handle was:
18. Connect the ends of fishing rod and steel tape together. Pull this contraption back – one end of the fishing rod should protrude through the grommet opening on the tailgate and the other should be sticking out where the handle is attached.
Are you wondering why this could not be accomplished by just using the fishing rod instead? Simply because it is not flexible enough when being pushed through (as compared to steel tape which has a flat profile and can be easily twisted and turn it to adjust the angle). Pulling the fishing rod is easy in comparison. The whole point was to avoid removing the large trim piece, remember?
19. Attach the end of the coaxial cable to the fishing rod and pull it all the way back until it comes out through the handle mounting hole:
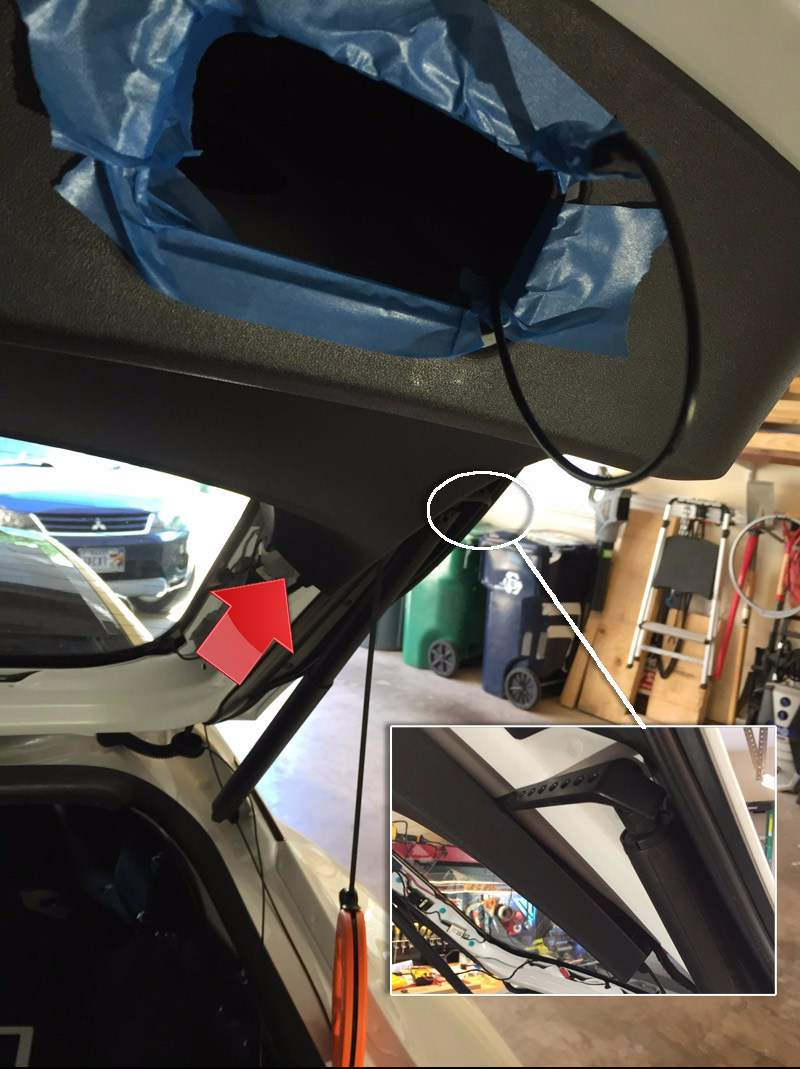
20. Use the steel fishing tape again, starting underneath the trim (the spot marked with an arrow on the picture below). To make it a bit easier, use the trim removal tool to lift the plastic trim away from the metal. That’s why we needed to remove the Torx screw in step 15. Genius, I know.
21. Attach the end of the coax cable to the rod and pull it back:
The worst is behind us.
Just in case it became confusing why we need all this trickery to pull the cable back and forth, here’s a picture illustrating it:
Basically, we are running the cable through the rubber tubing, continuing through metal part of the tailgate and underneath the large piece of the trim without drilling additional holes in the aluminium panel or unnecessary disassembly.
Mounting the rear camera
22. Connect the coaxial cable to the rear camera. Mount the unit in the bracket and center its lens (along vertical axis) on the rear window. Restore the power to the front camera (this will also provide the power to the rear). Now you can use the phone app to preview the image.
The image preview appears upside-down. Use the BlackVue mobile application to rotate the rear camera view 180 degrees.
If you are happy with the results, remove the backing foil and attach the camera permanently to the window. Hold it still against the glass for few seconds to assure a firm contact.
Final steps
All that is left at this point is to put things back together:
- Start with adjusting the coaxial cable across the whole run. Make sure you have just enough slack in the front and that the cable is not hanging loosely or visible anywhere around the roof. Ensure that you have enough slack where the cable runs through the tubing connecting car body with the tailgate panel (close and open the tailgate few times to test it).
- There should be some additional length of the cable left. I used the space beneath the horizontal trim of the tailgate to tuck it in, taping it in few places to avoid the cable being pinched when I insert the trim piece back.
- Remove the trim removal tool from the large piece on the tailgate and fasten the trim back in place with the Torx screw.
- Replace broken or damaged retaining clips and reattach the panels, starting with the vertical one. Do the same with the horizontal piece, making sure the clips do not pinch any of the wires. Give it an honest punch with your palm to push it back in place.
- Reconnect the power to the lift gate handle and reinsert the handle.
- Reattach the C pillar trim pieces. Don’t forget to fasten the Torx screw underneath the shelf support.
Congratulations! We are done!
P.S. If you found this guide helpful, kindly leave your feedback. If you have additional questions/comments/tips, please leave comment in as well, so others can benefit too. Appreciate it!

Great guide! You are a brave man taking apart new Tesla! 🙂
LikeLike
Haha… watching a number of videos first gave me the necessary confidence 🙂
LikeLike
Why didn’t you mount rear on top of rear window instead of bottom? Gives better view plus out of way. Can’t even see it from drivers rear view mirror.
LikeLike
Thank you for your comment, appreciate it.
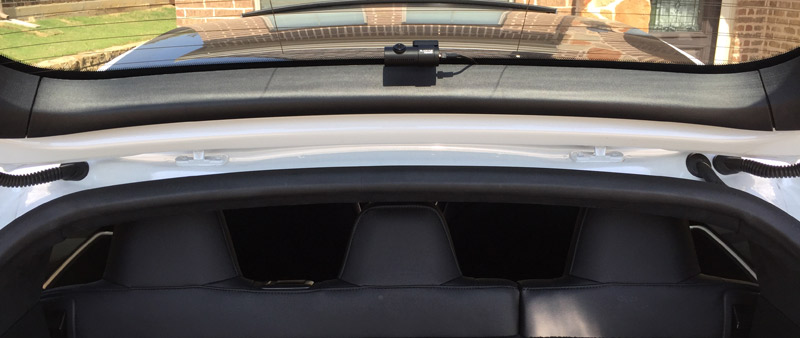
It is mounted on top – what you are looking at is the picture where the tailgate is open, so it appears as if it was mounted at the bottom. I know, confusing 🙂
LikeLike
In Tesla Model S 100D from March 2018 the in-car auxiliary connector is connected to a module (in intrusion detection module?). The voltage measured on all the pins is different. This is also mention buy another person in another forum two weeks ago. What do other people measure in new cars from 2018?
LikeLike
Hello Rijder, thanks for bringing this up. Looks like it has changed for 2018 models. In reply to you on TMC I have suggested to look at post #47, this might be a good alternative: https://teslamotorsclub.com/tmc/posts/2571390/
LikeLike
Thanks. See my comment there. Most probably, the connector is usable, but how…
LikeLike
Apparently this is the best solution https://teslamotorsclub.com/tmc/threads/12v-constant-in-rear-trunk.72868/ Run the power cable along the cable for the rear camera to the trunk and connect it to 12 V (14 V) over there.
LikeLike
It seems like it – just and additional step. Thanks for sharing.
LikeLike
How long did it take?
LikeLike
About 3 hours, since I was doing it for the first time and wanted to be extra careful (plus documenting as I was going).
LikeLike
[…] original write up can still be found here, but this should provide even more complete step-by-step procedure. Hope you enjoy […]
LikeLike
How would you run the cable when you do not have the panoramic roof? i have a model S with the fully closed roof
LikeLike
Hello JP, in this case you would run it along the A pillar (need to be careful around the airbags), down to the footwell and following the door sills.
LikeLike
[…] For more information please check out my blog: https://evcharged.blog/2017/10/20/blackvue-dr750s-2ch-installation-in-2017-tesla-model-s/ […]
LikeLike